If you’re an Apple user and you’ve started getting into home automation, or just getting more smart home tech, then Homebridge is worth considering, it offers you the ability to run a lot of non Homekit supported devices natively within Apple Home.
It’s reasonably simple to do too, this guide talks through what you’ll need and how to set everything up without having to plug your Raspberry Pi into a monitor.
What you will need
Raspberry Pi 3 B+, Pi 4 (2gb) or Pi 4 (4gb – currently on offer on Amazon – £52)
Raspberry Pi power cable (for v3 for v4)
Micro SD card (32gb, 64gb, 128gb)
Case (for v3 for v4) – I’ve recommended a heatsink case, it’s what I’m using for my Homebridge Pi too, rather than a noisy fan case – My Pi 4 seems to sit between 40-41c
Relevant adaptor to access your micro SD (USB-C adaptor, SD to Micro SD, USB to micro SD)
Getting the image / Pi OS onto the MicroSD
*this guide assumes you are starting from scratch – please skip ahead if you already have a working Pi that you can SSH into*
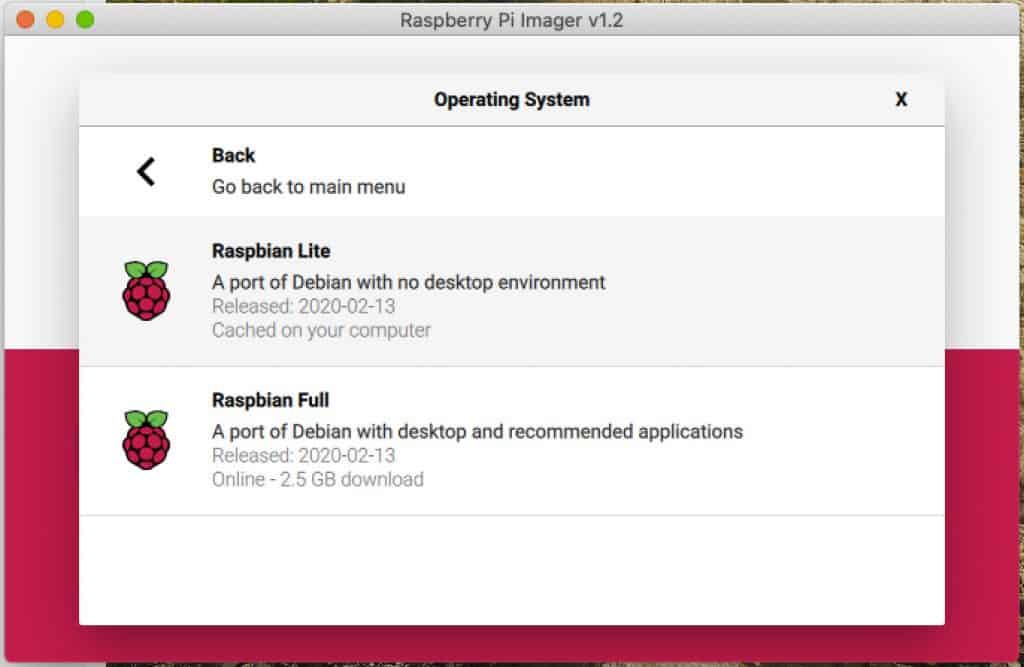
Once all your goodies arrive, we need to get an image onto the SD card. There are several ways of doing this (Etcher, Apple Pi Baker etc..) but a really simple way is to use the Raspberry Pi image imager.
Once downloaded, you put your card into your machine using the relevant adaptor, choose the relevant OS using the CHOOSE OS (I went for Rasbian Lite as I don’t need the desktop – feel free to use the normal Rasbian OS), locate your card using the CHOOSE SD CARD option, then click WRITE
Setting up WiFi and enabling SSH (so we can remotely connect to the Pi)
Once you’ve burnt the image onto your micro SD card, remove and reinsert.
You should now see a drive called boot within Explorer / Finder.
Within boot, we need to create an empty file with no content or file extension called SSH (with no full stop). On my Mac I used my preferred text editor (BBEdit – previously TextWrangler) to create the file and save it on boot with no extension. It’s been a while since I’ve had to use a Windows machine, but from memory you just have the option of right clicking and making a new file which is a bit simpler!
Next we need to setup WiFi on the Pi so it’s available to connect remotely. To do this, we need to create another file within boot called wpa_supplicant.conf
The contents of this file need to be as follows;
country=UK
ctrl_interface=DIR=/var/run/wpa_supplicant GROUP=netdev
update_config=1

network={
ssid="REPLACE_WITH_YOUR_WIFI_SSID"
scan_ssid=1
psk="REPLACE_WITH_YOUR_WIFI_PASSWORD"
key_mgmt=WPA-PSK
}
Double check you’ve got the details right, then save the file. Stick the microSD into the Pi, power it on and wait for up to a minute and a half for the Pi to complete it’s boot up.
Connecting to the Pi via SSH
Using your SSH application of choice (I’m using Terminal on my Mac, PuTTY appears to be a popular choice on Windows) it’s time to connect to the Raspberry Pi so we can get Docker installed and then TeslaMate.
First thing to do is locate the name or IP address of your Raspberry Pi on the network. If it’s the only Pi (that’s still called Raspberry Pi) you can SSH to raspberrypi.local, if you have more than one on your home network it’ll be raspberrypi-NUMBERVALUE.local – depending on how many you’ve got.
You can also find the device’s name and IP either using your router’s admin page and navigating to a page that shows connected devices, if you have something like a Mesh WiFi system it will show as a connected device (I have BT WholeHome and found it this way).
Once you’ve established the name, you connect using ssh pi@raspberrypi.local (or pi@whateverthehostnameoripis.local) the default password is raspberry
You may then be prompted if you are sure you want to connect, type yes and hit enter
Once logged in, reset your password by typing passwd and follow the instructions (existing password, new password, confirm password)
Installing Docker
These are the steps you need to follow:
Installing Docker: curl -sSL https://get.docker.com | sh
Set the Pi user permissions to run Docker:sudo usermod -aG docker pi
newgrp docker
Test the Docker installation has worked: docker run hello-world
Install dependencies:sudo apt-get install -y libffi-dev libssl-dev
sudo apt-get install -y python3 python3-pip
sudo apt-get remove python-configparser
Install Docker Compose: sudo pip3 install docker-compose
Installing Homebridge
First we need to create a docker-compose.yml file, on my Mac, I prefer to use nano in terminal, to create the file type in within your SSH window:
nano docker-compose.yml
Then paste in the following:
version: '2'
services:
  homebridge:
    image: oznu/homebridge:latest
    container_name: homebridge
    restart: always
    network_mode: host
    environment:
      - TZ=Australia/Sydney
      - PGID=1000
      - PUID=1000
      - HOMEBRIDGE_CONFIG_UI=1
      - HOMEBRIDGE_CONFIG_UI_PORT=8080
    volumes:
      - ./homebridge:/homebridge
Ctrl+X to quit (Y to save!)
Now we can start up Homebridge by running:
docker-compose up -dAccessing Homebridge
You can now get to Homebridge via your browser of choice by visiting:
http://<ip of machine>:8080 or http://nameofyourpi:8080
The default u/n and password is admin (for both), please reset the password at your earliest opportunity.
That’s it! You can now add your Homebridge device to Apple Home any devices you add via plugins will now appear in Apple Home ready for use.